ROOF
Thank you for visiting the Routemaster Owner and Operator's Forum (ROOF). Please feel free to use this forum for the mature discussion of any issues of interest and relevance to Routemaster owners. Please do not use this board to publicise your feelings about individuals, National or Local Government or TFL policy. Owners of other London bus types in service during the 1950s, 60s and 70s are also welcome to contribute to this forum.
Please note, the ROOF website no longer exists. The link from the Forum does not work anymore. Useful information and links from the website has been posted to the Forum.
Good afternoon,
I have just returned from MOT and sadly the bus failed on a 89% imbalance of the front.
When the bus was prepped (it had a whole host of new parts) the imbalance was 15% so it was an unfortunately timed sudden failure.
Looking underneath the N/S piston now had excessive travel so my first thoughts are slack adjuster. I just thought I would ask the more experienced amongst you what your first thoughts are before I start dismantling.
If it is the slack adjuster what are my options when it comes to a replacement?
Many thanks.
Tom.
My bus number (if any): RML2344
You appear to have too much clearance between the brake shoe and the brake drum, simply adjust the brake, that should cure it!
The square on the adjuster will only turn one way. Apply the handbrake, jack up the front wheel. Tighten the slack adjuster until the brake shoe just rubs the drum, check by rotating the wheel by hand.
I usually wind the adjuster up until the wheel will not turn, then slacken off the adjuster until the wheel just turns. To release the adjuster, you will have to remove the bolt at the top of the adjuster rod, a 7/16UNF spanner will do it, then with a spanner on the square, release it by turning the square. then you find the hole won't line up, so turn the body of the adjuster round until it does. Replace the bolt and the brake should be a lot better.
Then do the same on the other side; otherwise you may find the imbalance has changed sides!
Remove jack, start bus, go for a re-test!
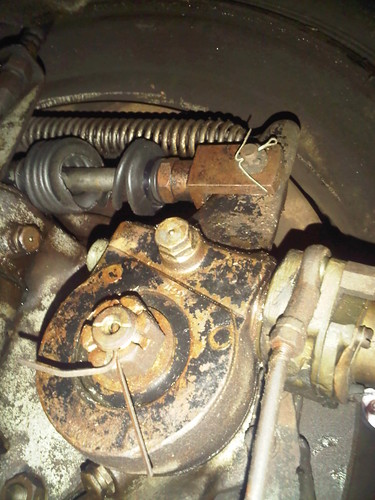
Edited to add looking at the picture again, it appears the picture was taken with the brake applied. the adjuster arm should be tipped back with the brake off. Are you sure the S cam hasn't flipped over? 89% is a lot of imbalance.
My bus number (if any): RML2532
I agree it does look as if the cam has turned over or alternatively it has got a slack adjuster for the opposite side of the axle fitted and the brake is actually fully wound off!. I would renew that bellows before you get a second failure on it and check the presence and condition of the gaiter as well.
Yes, I should have said that the brake is applied in this photo.
How common is it for the cams to turn over? I thought that would only really happen if the shoes were excessively worn. The brake shoes are about half worn.
The gaiter was new although I didn't fit it. It has since torn I believe.
Roy, when you refer to the bellow which part are you exactly referring to?
I will try and adjust the slack adjuster and will report back.
Many thanks for the replies so far.
My bus number (if any): RML2344
What I call the bellows is the torn rubber you can see in the picture and the gaiter is the other rubber seal (not shown) which goes round the output end of the wheel cylinder.Both are there to keep dirt out of the cylinder and have been MOT testable items for several months now.
Taken from PSV and HGV testers manual 2013. The same criterea apply to class V, but the latest manuals aren't on line yet.
Inspection 59 'brake systems and components', reason for failure 5,L: "Hydraulic brake actuator dust cover missing, insecure,excessively damaged or deteriorated to the extent that it would no longer prevent the ingress of dirt etc."
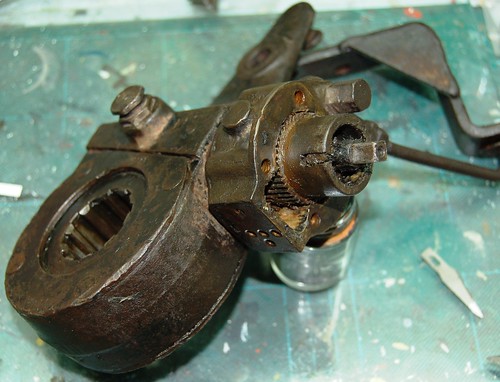
Having now got the slack adjuster off, I now have a better idea of the problem.
To answer some of the questions yes, there was a gap between the wheel and the drum. This would adjust out quite easily. It would have been quite easy to take it for retest at this point but doing that just didn’t seem right.
Messing about some more there just seemed to much movement over the whole adjuster. The only things which didn’t have any play in were the splines on the cam and the pin onto the piston.
Once removed the auto adjuster on the front (i think that is what it is called) doesn’t do anything. It just spins in both directions.
The O/S one works as it should but this has now also been removed.
The next stage is to work see what my options are. What are the options when it comes to getting these refurbished?
Any thoughts?
The operation of the cam and rollers is very good. No faults that I can see.
Also,
Thank you for the advice on the gaiters. Apart from the torn one on in the picture all the others are on good condition.
My bus number (if any): RML2344
Imperial do overhauled slack adjusters; I can strip and clean them and make them work or you can do it yourself, they're not rocket science!
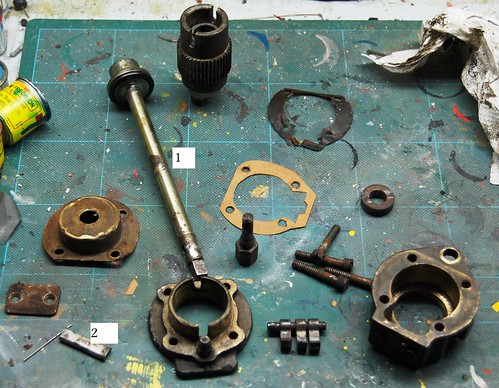
Having got the adjuster off the bus, degrease the outside. Remove the 2 little countersunk screws that hold a small oblong plate on and carefully remove 3 coli springs, don't lose them! The remove the 4 cheeses head screws that hold the adjuster cover on. This comes off with 3 pawls and very small washers. This will reveal the innards of the adjuster.
The difficult bit, remove the flat retaining bar which goes through the spindle. You'll have to hold the assembly in a vice and press down on the collar with a screwdriver to depress the internal spring while you try to push the retaining bar out with another screwdriver! This has an internal step so it won't fall out!
Remove the internal collar and coil spring, remove the adjuster spindle, then the body should come away from the main adjuster.
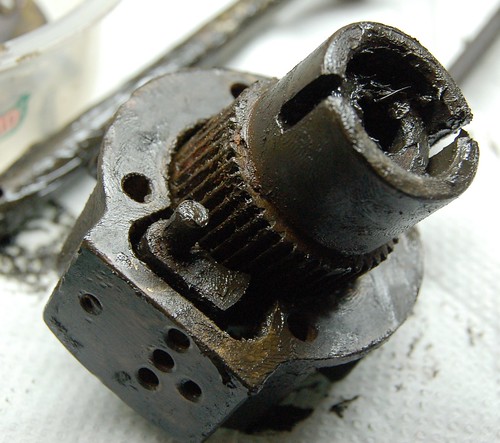
Thoroughly clean all the parts. It is possible to remove the 4 countersunk rivets which hold the big cover on by drilling the heads off then punching the rivets out. This will let you remove the adjuster gear wheel. Clean all the crap out of it and the housing and check everything for wear.
Reassemble the whole unit using clean grease. To replace the big rivets, I use M4 countersink screws with nuts. Before you put the top on the ratchet assembly, make sure the ratchet works. You should hear nice clicking sound.
Note the ratchets and housings are handed! DO NOT mix them up, this could lead to fatal results!
Fit adjuster to bus, adjust brakes to tight, then slacken off so the brake shoes just rub the drum, fit adjuster rod and insert the 3/16 bolt.
If any parts appear badly worn send the unit to Imperial where they have the bits to do a proper rebuild.
My bus number (if any): RML2532
Having got the adjuster off and partly dismantled it looks like it might be hardened grease which stopped the auto adjuster working. This failure consequently caused the brakes to unwind as the bus was driven along!
It doesn’t show it in the picture but there is very little grease on the gear itself. What is there is only there because of my handling.
The next stage is to see what happens when the adjuster is assembled.
Many thanks for advice and guidance received so far, especially from Roy.
My bus number (if any): RML2344
The LT manual says graphited oil is to be used to lubricate the slack adjuster at each brake shoe change, not grease. This change from grease was made in 1965, may have been updated since though.
My bus number (if any): RTL 960, RMC 1458 RM 1585, (M 961, M 271 - both sold) and several RTs
I'd suggest you remove the rivets holding the big gear in. Drill out the countersink on one side and punch the rivets through. Clean everything thoroughly and re-assemble. I use csk metric screws to replace the rivets with nyloc nuts on the back. I also burr over the head of the screw for good measure! All should work well once it's all cleaned. Make sure the teeth in the adjuster are really clean. v
Also don't mix up left and right hand parts, they're different.
My bus number (if any): RML2532
The stripped adjuster.
The 3 teeth which run along the gear had seized solid. The gasket was broken which probably lead to water getting in.
The replacement was made from gasket paper.
Still struggling with finding a replacment gaiter. Anyone any thoughts?
My bus number (if any): RML2344
I think I have gaiters in stock, if not, Imperial have them.
Reminder, gaiters are now an MoT failure item if broken or missing! there is no requirement to retro-fit them if they were not fitted from new.
My bus number (if any): RML2532
Replacement gaiters sourced.
Having now fitted them back on I am going to attempt to adjust them up soon. Is there any tips or advice for doing this on an RM before I start?
Regards,
Tom
My bus number (if any): RML2344
Jack up back wheels, secure the bus with chocks, release handbrake. Remove handbrake rods from the relay levers so they are disconnected, you'll need a 1/2"bsf spanner to loosen the lock nuts by the fork ends, then remove clevis pins. Remove the bolt that secures the slack adjuster rod. Wind the brake adjusters right off using a spanner, it' an odd size but an 8mm usually does the job, unless you have the special tool.
At one wheel, make sure the wheel turns freely, then adjust the brake till the wheel locks; then back off the adjuster until the wheel is just free. You might hear some scraping from rust in the drum or feel some binding from an oval drum. Do the same for the other side. This sets the foundation brake.
Offer up the handbrake rods and adjust the length of them to suit the new settings by turning the fork ends; refit clevis pins and castle nuts, remember to fit the split pins.
Remove jacks etc. Go to the cab and test the handbrake. This should start to bite on the 2nd or 3rd click and come up about 5 clicks.
Any further problems, come back for more info!
My bus number (if any): RML2532
You probably know this Tom, but it might be worth mentioning that when you wind off the slack adjusters that they are "handed".
To wind off the O/S/F & N/S/R you turn anti-clockwise and for N/S/F & O/S/R you turn clockwise.
You cannot wind off completely on any wheel the bolt securing he upper end of the operating rod must be removed,
I know that some of our continental friends don't know this and that is how worms get sheared and squares rounded or sheared!
My bus number (if any): RTL 960, RMC 1458 RM 1585 and several RTs
Sadly RML2302 failed her Class V recently because the readings for the OSR brakes were about half what they should be (apparently - 600?) The test was done at ServiceDirect Durham (formerly Durham County Council workshops). They diagnosed a seized brake adjuster and I now have the part.
Imperial have quoted £272 plus VAT for an exchange unit which Durham say is "not a bad price" but I am tempted by Roythebus's "not rocket science" very helpful post on how to "clean out the cr*p"to have a go at fixing it with help from more able friends. I did however note Roy's last comment about if parts are too worn send it to Imperial for a proper job which seems to be a bit of a catch22 - ie you won't know if the parts are over-worn until you have a greasy 3D jigsaw puzzle... Also the square rod protruding from the domed part is bent which presumably may be a problem. I wonder if I could have people's views please on the best way to jump... ? (the only urgency is although Durham are helpful I'm sure they don't want 2302 to be a permanent fixture).
My other problem is they have asked for replacements for the two clevis pins as they say the threads are damaged and only the split pins were holding them. Does anyone know of a supplier please or alternatively is tapping a new thread an option? Thanks in anticipation (as they used to say) for your wise advice!! Brian
My bus number (if any): RML2302
PS It's a long, long time since I used a stock tap and die set at school but of course I meant "re-thread" rather than "tap" ......
My bus number (if any): RML2302
If the square end is worn or damaged, it will need to be replaced. For speed, get a replacement from Imperial, it will save a lot of time. I have new clevis pins in stock, are these the ones with the return spring attached? If so I have some of these part-worn but useable.
The brakes are designed to automatically adjust, which they are not very good at doing. Apart from the adjuster itself seizing, the amount of wear in the linkage which operates it also has a considerable influence, the adjuster relies on sensing the amount of free travel, too much and it will not adjust early enough. The special peg bolt which goes through the rose joint wears, as does the joint. At the bottom of the link rod it is not unusual to find that the split pin has almost rusted away. Removing the link rod will often reveal that the rod has almost worn away. This then runs in a slot in the bracket which also elongates. The brackets are different front and rear and side to side.
Now comes the important bit. When the system was designed, the length and angle of this slot governed when the brake would adjust.
So, what is the correct length of this slot? Only an engineering drawing or a new part will hold the clue.
Brian,
You will need new nuts for the replacement clevis pins. Some will be 3/8 bsf and some 3/8 unf thread. They are drilled for a split pin. If you look up Namrick nuts and bolts on the net you can get what you need mail order. They refer to nuts which require a split pin as "slotted nuts". For the cost of these and the avoidance of delay you may as well order 2 slotted and 2 nyloc nuts in each thread form; that will probably come to less than the postage and packing.
Thank you yet again Roys for your great advice and help. I will be in touch with you both by email asap and will be sending my adjuster to Imperial.
This really highlights again how those of us who are hundreds of miles from the Home Counties and don't have access to the on-the-spot help of people with the vast experience of the Roys are at such a disadvantage. Just as well that people like Chris take the trouble to give a great forum like this to enable us all to get the next best thing!! Thanks again gentlemen.
Brian
My bus number (if any): RML2302
As far as I know Brian, that price you were quoted is for a service exchange, Imperial no longer repair your one, so no cost advantage in trying hat unless you can get a special arrangement.As Roy Gould has said they are not rocket science and usually need a good clean, the square can be replaced the RMOA have them. Only fiddle factor could be as we had on one, the worm was snapped, but that was due to someone trying to wind it off the wrong way.
We had almost the same problem as you have on RML 2608 and after getting the adjusters working, we found the drum was well over limit and changed both sides.
My bus number (if any): RTL 960 RMC 1458, RM 1585 and loads of RTs
Thanks Brian - I did realise it was the price for an exchange, sorry if that wasn't clear. As Roy L and yourself imply, and I suspect, this may well not be the end of the story of getting the brakes on this wheel back up to scratch ......
My bus number (if any): RML2302
Brian
If you have this problem on one brake adjuster it probably follows that the others are not far behind in this condition. From a personal point of view I would opt for preventive maintenance and have the other 3 exchanged as well if Durham do not understand the units and cannot check them for you. This highlights the sort of problems lurking with buses that are not used frequently and sit around for long periods of time, they require preventive maintenance as I have found out at not a little cost in the past.
Sorry to sound expensive.